Home Theater Subwoofer Clipping – 8 Causes and Fixes
If your home theater subwoofer is clipping, it’s best to turn it off. The distortion will prevent you from hearing it properly, and you could also be risking permanent damage.
The number one cause of a home theater subwoofer clipping is an incorrect setting on the receiver. The wrong DB (decibel) levels can make your subwoofer work harder than it should and cause clipping. But adjusting the DB setting is as simple as turning it down a notch or two.

SUBWOOFER CLIPPING
This article will show you what clipping sounds like, how to identify the cause, and how to fix it. I’ll also share some of the tools I use to help me troubleshoot and fix clipping in home theater systems.
Also read: Will Underpowering a Subwoofer Damage it?
As an affiliate, I may collect a share of sales or other compensation from the links on this page.
What Is Home Theater Subwoofer Clipping?
Home theater subwoofer clipping is a distortion that occurs when the receiver is overloaded. The sound wave becomes “clipped” off at the top and bottom, causing a square wave instead of a smooth sine wave. You will need an oscilloscope to see the clipping, though it can also be audible.
Clipping sounds like a harsh, distorted sound that can be loud and unpleasant. It might also come off as a popping sound from your sub. Either way, if you hear any funny sounds, your system is clipping.
When an amplifier clips, it works harder than it should. This can cause the amplifier to overheat and eventually fail — not to mention damage your speakers. That’s why it’s important to identify and fix clipping as soon as you hear it.
I’ve lost one subwoofer and two receivers to clipping. The first time it happened, I had no idea what was going on. I thought my sub just blew out. It wasn’t until the second time that I realized what was happening and how to fix it.
Now, let’s look at some common causes of clipping and how to fix them.
1. Incorrect Settings on the Receiver
Think of the receiver as the brain of the operation. It tells the subwoofer how much power to use and how loud to play. You have to get this part right to get the most out of your equipment.
Any decent home-theater system will let you tweak the sound level of the individual components. For example, if you have a 5.1 system, you’ll have five main channels (left, right, center, left surround, right surround) and one subwoofer channel.
Each of these channels has its level of control. If your receiver is set to “movie” mode, the center channel might be set to +5 and surround to +3. But if you switch to “music” mode, the settings might change to +2 and +4, respectively.
How To Fix
Make sure your receiver is set to the correct mode, and that the levels are where they should be. If your subwoofer is set too high, it’ll clip. It’s that simple. However, the general rule is to set the individual DB settings as close as possible to 0.
2. Incorrect Crossover Settings

The crossover is the frequency at which the subwoofer hands off the low frequencies to the main speakers. It’s typically set to 80 Hz.
If your crossover is set too low, it can cause clipping. That’s because the subwoofer will try to reproduce frequencies that are too low for it to handle. As a result, the subwoofer will be working harder than it should — and will eventually clip.
How To Fix
The solution is to raise the crossover setting. For example, if it’s set to 80 Hz, try increasing it to 100 Hz or even 120 Hz. This will allow the subwoofer to focus on the frequencies it’s designed to reproduce. That should take some strain off the amplifier.
3. Overdriving Your Subwoofer
If you’re pushing your subwoofer too hard, it’ll clip. This is because you’re asking the amplifier to produce more power than it’s designed for.
This can happen if you play your music too loud or try to reproduce frequencies that are too low. This usually happens when you play bass boosted tracks or have the subwoofer on high DB and volume for too long.
How To Fix
The solution is to back off on the volume or stop playing bass boosted tracks. If you’re clipping at lower volumes, try raising the crossover setting gradually. This will allow the main speakers to reproduce the low frequencies, and take some strain off the subwoofer.
4. Wiring Issues
If your subwoofer is connected to the receiver with an after-market wire, the cable may not be thick enough. This can cause a voltage drop — and eventually clipping.
This isn’t a common problem because most home theater systems have thick, high-quality speaker wires. But it’s something to keep in mind if you’ve ever modified or swapped cables.
How To Fix
If you suspect that your speaker wire is causing clipping, try replacing it with a thicker gauge wire. This will help to ensure that the full voltage is reaching the subwoofer. It’s also a good idea to get the same wires that came with your system.
For example, if you have a 5.1 system, use the cables that came in the box or a similar wire when connecting the subwoofer. These are usually thicker than the standard speaker wire.
5. Mismatched Amplifier and Speakers
The setup will eventually clip if the speakers are more powerful than the amplifier. This is because the amplifier can’t provide enough power to the speakers.
For example, if you have a receiver that can provide 100 watts per channel, but the subwoofer is rated for 200 watts, it’ll clip because it’ll never get enough power to work efficiently.
How To Fix
The solution is to make sure that your amplifier can handle the power requirements of your speakers. If you have 200-watt speakers, make sure you have an amplifier that can provide at least 200 watts per channel. You can also try to find speakers that better match your amplifier.
So, if you have a receiver that can provide 100 watts per channel, look for speakers rated for 100 watts or less.
6. A Damaged/Underpowered Speaker
If you have a damaged speaker, it’ll eventually cause the amplifier to clip. This is because the speaker can’t handle the power the amplifier is trying to provide.
How To Fix
The solution is to replace the damaged speaker with a new one. If you have a surround sound system, you can try to find a matching center or rear speaker. Alternatively, you can upgrade to a more powerful speaker. If you have a subwoofer, you can try to find a matching amplifier or a more powerful subwoofer.
7. A Faulty Amplifier
If the amplifier is damaged, it’ll eventually show signs of clipping. This is because the amplifier can’t provide enough power to the speakers. The result is a distorted sound that can be extremely annoying.
How To Fix
The solution is to replace the damaged amplifier with a new one. It’d also help if you got the same model amplifier to match the rest of your system. Alternatively, you can try to fix the amplifier yourself if you know your way around home theater systems.
8. A Bad Connection
If you connect the wire destined for the sub to any other speaker, the system will end up clipping. This is because the other speaker can’t handle the power the amplifier is pushing out. The result is a distorted sound and a damaged speaker.
How To Fix
The solution is to connect the correct wire from the amplifier to the subwoofer. Just make sure that you don’t connect it to any other speaker. This is where the user manual comes in handy. If you don’t have the user manual on hand, you can refer to online forums related to your home theater system.
Tools You Need To Check Clipping Like a Professional
Listening for distortion is the best way to check for clipping. But sometimes, it can be hard to hear. That’s why it’s a good idea to have a few tools on hand to help you out.
1. Oscilloscope
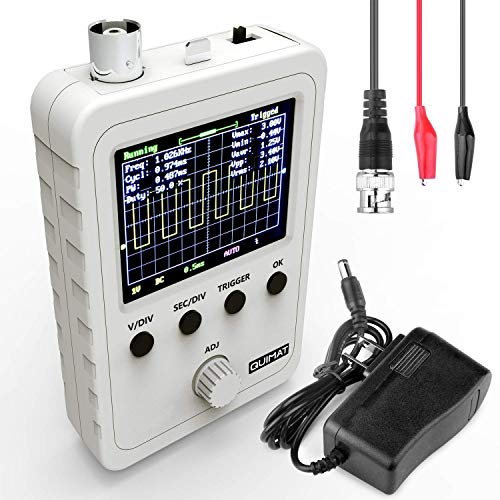
An oscilloscope is a tool that lets you see the waveform of the audio signal. This is useful for checking for clipping because you can see when the waveform is getting cut off. You can get something like the AUKUYEE Updated 2.4″ TFT Digital Oscilloscope Kit (available on Amazon.com). In case you’re not comfortable operating this type of equipment, it comes with detailed operating instructions for your convenience.
2. Multimeter
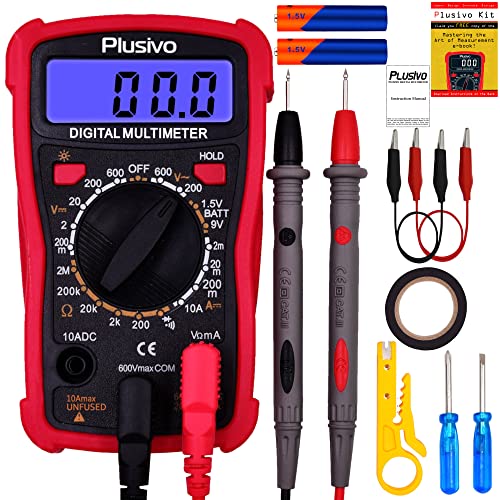
A multimeter is a tool that lets you measure the voltage of the audio signal. This is useful for checking for clipping because you can see when the voltage is too high or low.
I recommend the Plusivo Digital Multimeter (available on Amazon.com). It comes with its kit containing all the tools you need and has a 30-day manufacturer’s guarantee if you’re not satisfied with the product.
3. Distortion Detector

This is a specialty tool that’s designed to detect distortion. It’ll even produce sound in the required decibels, so you can know where to set your gain. I’d try to get something like the Steave Meade Designs SMD DD-1 Distortion Detector (available on Amazon.com), which blinks when it detects distortion.
Summary
If you have a clipping subwoofer, it’s important to find and fix the issue. Otherwise, you’ll continue to have a distorted sound that eventually damages the subwoofer.
There are a few different clipping causes, but the most common ones are listed above. If you can’t find the reason, you can always take your system to a professional to have it checked out.
In most cases, the solution is to replace the damaged component. But you can also try to find a better match for your system or upgrade to a more powerful amplifier or speaker.